HOW TO CREATE A DVD RIP
HOW TO CREATE A DVD RIP:
This tutorial has been made to teach you how you can make a high quality(in less size possible) DVD Rips in an easy to understand way. Just follow below instructions one by one.
Software that will be required are as follows:
You can download them from the links provided(just click on name of the software) ; so that you can read the instructions and perform those steps on your computer simultaneously.
1. DVD Decrypter(License: Freeware)
We will do the entire Process in Two Steps:
Step 1. In this step we will rip the Original DVD to Hard Disk By using DVD Decrypter.
Step 2. In this step we will make the actual high quality rip by using AutoGK.
Step 1 :- ripping the Original DVD to Hard Disk By using DVD Decrypter
1.Install and Open DVDDecrypter
2. General look of DVD Decrypter
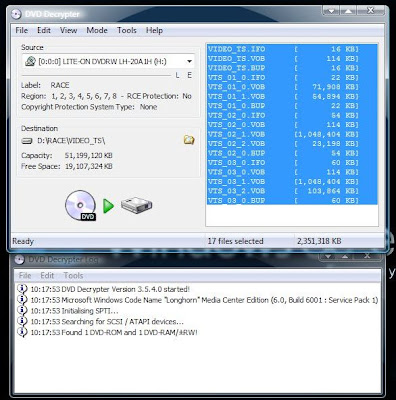
The program should look similar to the image Below. Source is the original DVD that is in your DVD Driver. Destination is the folder where the files will be stored. Make sure you select a folder on a hard drive that has enough storage space as the folder will be approx 3.0 – 4.3 GB in size.

3.Insert a DVD to be ripped into your PC's DVD drive.

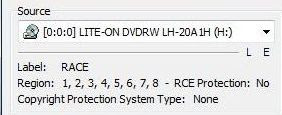
Place the DVD that you want to rip in your DVD Drive. Now select your DVD Drive from the source drop down box. As you can see, mines a Lite-on DVDRW. Label is what the DVD is named on the Disc. Region is what regional settings the disc is set to. As you can see, the disc that I’m using is region free, as it list all the regions. This disc also has no RCE protection. This DVD also doesn’t have a copyright protection system on it either. If your disc has the region set to one system and RCE Protection is set to yes, you can remove if by selecting the “Tool” menu, then clicking “Settings…”

The setting dialog will then appear. Now tick the “Remove Macrovision Protection” check box, this will remove the Macrovision flag of the VOB files on the disc. RCE Protection Region should be set to the region your drive (or standalone DVD player) has. You can find the regions below.
DVD regions
Region 1 - 1: U.S., Canada, U.S. Territories
Region 2 - Japan, Europe, South Africa, and Middle East (including Egypt)
Region 3 - Southeast Asia and East Asia (including Hong Kong)
Region 4 - Australia, New Zealand, Pacific Islands, Central America, Mexico, South America, and the Caribbean
Region 5 - Eastern Europe (Former Soviet Union), Indian subcontinent, Africa, North Korea, and Mongolia
Region 6 - Peoples Republic of China
Region 7 - Reserved
Region 8 - Special international venues (airplanes, cruise ships, etc.)
4. Selecting the Destination Drive

Click the small folder with the magnify glass icon. The save dialog will then appear. Select a folder that you want the DVD to be ripped to. Remember to make sure you have enough space available on your hard drive.
5. Selecting the Main Movie Files
This is the most important step in decrypting the DVD. Before you start the decryption process you need to make some settings in DVD Decrypter.
first of all you should select all the files of the main movie. As now a days movies comes with ads and promos of upcoming movies.. so selecting a main movie is important. You can do this in the EDIT Menu. Click on option "Select Main Movie Files" by default it will select the main movie files. Cross check whether it has selected the original movie file or not by actually playing those files directly from DVD in Media Player.( You can use drag and drop to select files in DVD and playing in media player) . I always select the option "select all vob files" and i will use this method here.It is generally best to select vob files with large sizes.
Make sure you selected FILE Mode in Mode Menu. Now go to Tools-setting-file mode tab- select file splitting - None. see below picture-
As you can see in above picture all vob files are selected.You are now ready to start the decryption process.small status at the bottom of the program tells you how many files are selected, it also tells us the total size of all the files that are selected. This is a good indication on what space you will need available on your hard drive. Once they are all selected, all you have to do is click the big button on the bottom left of the program (The button with the DVD disc, Green arrow and Hard Drive icons).
6. Decrypting the DVD
The program is now extracting the sectors, now all you have to do is wait until the process has finished. In other words, you can have a break for a while.
When this process is finished, this dialog will appear. Now go to the folder that you selected as your destination. All the files should be in the folder that you selected. You can test the files by opening your favourite DVD player software and testing the movie.
7. Sequencing all vob files in a proper order
You will get all vob files in the destination folder. check vob files in your media player and remove unnecessary vob files such as ads and promos. Now you need to make all vob files of the main movie in a proper sequence.For this you need to change names of all files. first identify the starting vob file. it will be generally VTS_01_1.vob. Rename all vob files in the sequence of the movie. Like this VTS_01_1,VTS_01_2,VTS_01_3 and so on.
This step is useful when the movie is under various IFO. You can use this step all the time in all types of movies.
Step 2 – Converting the DVD to AVI (Ripping)
1. Look of AutoGK
Open AutoGK, it should look like the one above.
2.Selecting the correct input file and output file:-
Click the folder icon next to the input file box. The open dialog will then appear.

Now locate the destination folder that you used in Step 1, when you were using DVD Decrypter. Open the “VIDEO_TS” folder. The files should look something like the above. As you can see in above image i have renamed all my vob files in a proper movie order. Now select the first vob file in this case it is VTS_01_1.VOB. i.e; your input file should be VTS_01_1.VOB.Proceed to next step.
3- Selecting Audio and Subtitles
As you can see from the image above, the program lists the audio tracks that are available and the subtitle tracks that are available. Select the language that you want your DVDRip to have. You can also rip the subtitle tracks also. To do so, just tick what subtitles you want. As you can see, I selected English AC3 2ch(As its the only one available) . I prefer to choose the 6ch option over the 2ch, if its available. 6ch is surround sound and 2ch is just your basic left and right sound. if you have selected 6ch option make sure that you select higher size in the next step. As 6ch audio requires more space than 2ch audio, if you are selecting 6ch audio for a 700 mb rip then be ready to compromise to some extent to video quality( although video quality depends on many more factors than just audio size).
You can select subtitles if you want from the all available options, if you don't want then leave all choices unchecked.
4 - Selecting Output size
When creating a DVDRip most people tend to have a file size set to around 700mb. So place a check in the “Custom size (MB):” radio check box. Then type in 700 in the box next to it. So the outcome of the DVDRip will be 700mb. You can change the file size, the more MB that you add, generally the clearer the DVDRip will be. For a movie more than 2 hours , consider selecting size more than 800 MB. Play around these size factor for some time and then you will understand which works best for you.
5- Advance Parameters
Click the Advance Settings button like above to show the Advance options dialog.
For “Output resolution settings” I usually select Auto width.
For “Codec” I personally prefer XviD over DivX, it seems to produce a better image quality, so choose XviD.
For “Output audio type”, I normally leave it set to Auto. If you are ripping music videos from a DVD, i suggest you select “Original” as it would produce a lot better sound quality then normal.
For “Output format” select AVI.
For subtitle options, I don’t tick any of the boxes.
Click the “OK” button to save your settings.
6-Hidden Options
Press ctrl+F9 to see hidden options dialogue box as follows:
I generally prefer to select only following options. As all other options are for advance users
1.Force Sharp MPEG metrics for XVID
2. Force deinterlacing when source was detected as hybrid.
3. For cartoon mode for XVID ( select this if you are ripping animated movie)
If you want to know more about hidden options click here.
7. Converting
After selecting the required hidden options now you can click on " Add Job" button. it will add job to the queue. press " start " button to start ripping.
This process will generally take about 2 hours on a medium spec PC. Time taken to complete this task depends upon your CPU. So don't worry if it takes time be patient.
Whether you like my post or don't like my post.Don't forget to leave a comment. Any suggestions for improvement are most welcome.


 Subscribe by RSS