HOW TO CREATE A DVD RIP

HOW TO CREATE A DVD RIP:

This tutorial has been made to teach you how you can make a high quality(in less size possible) DVD Rips in an easy to understand way. Just follow below instructions one by one.

Software that will be required are as follows:

You can download them from the links provided(just click on name of the software) ; so that you can read the instructions and perform those steps on your computer simultaneously.

1. DVD Decrypter(License: Freeware)

2. AutoGK (License: Freeware)


We will do the entire Process in Two Steps:

Step 1. In this step we will rip the Original DVD to Hard Disk By using DVD Decrypter.

Step 2. In this step we will make the actual high quality rip by using AutoGK.

Step 1 :- ripping the Original DVD to Hard Disk By using DVD Decrypter

1.Install and Open DVDDecrypter

2. General look of DVD Decrypter

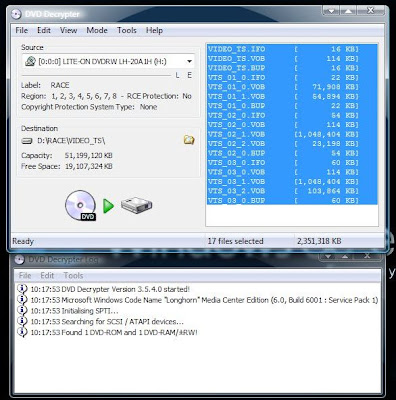
The program should look similar to the image Below. Source is the original DVD that is in your DVD Driver. Destination is the folder where the files will be stored. Make sure you select a folder on a hard drive that has enough storage space as the folder will be approx 3.0 – 4.3 GB in size.
3.Insert a DVD to be ripped into your PC's DVD drive.
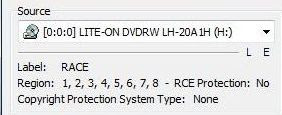


Place the DVD that you want to rip in your DVD Drive. Now select your DVD Drive from the source drop down box. As you can see, mines a Lite-on DVDRW. Label is what the DVD is named on the Disc. Region is what regional settings the disc is set to. As you can see, the disc that I’m using is region free, as it list all the regions. This disc also has no RCE protection. This DVD also doesn’t have a copyright protection system on it either. If your disc has the region set to one system and RCE Protection is set to yes, you can remove if by selecting the “Tool” menu, then clicking “Settings…”


The setting dialog will then appear. Now tick the “Remove Macrovision Protection” check box, this will remove the Macrovision flag of the VOB files on the disc. RCE Protection Region should be set to the region your drive (or standalone DVD player) has. You can find the regions below.

DVD regions

Region 1 - 1: U.S., Canada, U.S. Territories
Region 2 - Japan, Europe, South Africa, and Middle East (including Egypt)
Region 3 - Southeast Asia and East Asia (including Hong Kong)
Region 4 - Australia, New Zealand, Pacific Islands, Central America, Mexico, South America, and the Caribbean
Region 5 - Eastern Europe (Former Soviet Union), Indian subcontinent, Africa, North Korea, and Mongolia
Region 6 - Peoples Republic of China
Region 7 - Reserved
Region 8 - Special international venues (airplanes, cruise ships, etc.)

4. Selecting the Destination Drive


Click the small folder with the magnify glass icon. The save dialog will then appear. Select a folder that you want the DVD to be ripped to. Remember to make sure you have enough space available on your hard drive.

5. Selecting the Main Movie Files


This is the most important step in decrypting the DVD. Before you start the decryption process you need to make some settings in DVD Decrypter.

first of all you should select all the files of the main movie. As now a days movies comes with ads and promos of upcoming movies.. so selecting a main movie is important. You can do this in the EDIT Menu. Click on option "Select Main Movie Files" by default it will select the main movie files. Cross check whether it has selected the original movie file or not by actually playing those files directly from DVD in Media Player.( You can use drag and drop to select files in DVD and playing in media player) . I always select the option "select all vob files" and i will use this method here.It is generally best to select vob files with large sizes.

Make sure you selected FILE Mode in Mode Menu. Now go to Tools-setting-file mode tab- select file splitting - None. see below picture-


As you can see in above picture all vob files are selected.You are now ready to start the decryption process.small status at the bottom of the program tells you how many files are selected, it also tells us the total size of all the files that are selected. This is a good indication on what space you will need available on your hard drive. Once they are all selected, all you have to do is click the big button on the bottom left of the program (The button with the DVD disc, Green arrow and Hard Drive icons).

6. Decrypting the DVD

The program is now extracting the sectors, now all you have to do is wait until the process has finished. In other words, you can have a break for a while.


When this process is finished, this dialog will appear. Now go to the folder that you selected as your destination. All the files should be in the folder that you selected. You can test the files by opening your favourite DVD player software and testing the movie.

7. Sequencing all vob files in a proper order

You will get all vob files in the destination folder. check vob files in your media player and remove unnecessary vob files such as ads and promos. Now you need to make all vob files of the main movie in a proper sequence.For this you need to change names of all files. first identify the starting vob file. it will be generally VTS_01_1.vob. Rename all vob files in the sequence of the movie. Like this VTS_01_1,VTS_01_2,VTS_01_3 and so on.

This step is useful when the movie is under various IFO. You can use this step all the time in all types of movies.


Step 2 – Converting the DVD to AVI (Ripping)

1. Look of AutoGK

Open AutoGK, it should look like the one above.

2.Selecting the correct input file and output file:-

Click the folder icon next to the input file box. The open dialog will then appear.


Now locate the destination folder that you used in Step 1, when you were using DVD Decrypter. Open the “VIDEO_TS” folder. The files should look something like the above. As you can see in above image i have renamed all my vob files in a proper movie order. Now select the first vob file in this case it is VTS_01_1.VOB. i.e; your input file should be VTS_01_1.VOB.Proceed to next step.

3- Selecting Audio and Subtitles

As you can see from the image above, the program lists the audio tracks that are available and the subtitle tracks that are available. Select the language that you want your DVDRip to have. You can also rip the subtitle tracks also. To do so, just tick what subtitles you want. As you can see, I selected English AC3 2ch(As its the only one available) . I prefer to choose the 6ch option over the 2ch, if its available. 6ch is surround sound and 2ch is just your basic left and right sound. if you have selected 6ch option make sure that you select higher size in the next step. As 6ch audio requires more space than 2ch audio, if you are selecting 6ch audio for a 700 mb rip then be ready to compromise to some extent to video quality( although video quality depends on many more factors than just audio size).

You can select subtitles if you want from the all available options, if you don't want then leave all choices unchecked.

4 - Selecting Output size

When creating a DVDRip most people tend to have a file size set to around 700mb. So place a check in the “Custom size (MB):” radio check box. Then type in 700 in the box next to it. So the outcome of the DVDRip will be 700mb. You can change the file size, the more MB that you add, generally the clearer the DVDRip will be. For a movie more than 2 hours , consider selecting size more than 800 MB. Play around these size factor for some time and then you will understand which works best for you.

5- Advance Parameters

Click the Advance Settings button like above to show the Advance options dialog.


For “Output resolution settings” I usually select Auto width.
For “Codec” I personally prefer XviD over DivX, it seems to produce a better image quality, so choose XviD.
For “Output audio type”, I normally leave it set to Auto. If you are ripping music videos from a DVD, i suggest you select “Original” as it would produce a lot better sound quality then normal.
For “Output format” select AVI.
For subtitle options, I don’t tick any of the boxes.
Click the “OK” button to save your settings.

6-Hidden Options

Press ctrl+F9 to see hidden options dialogue box as follows:

I generally prefer to select only following options. As all other options are for advance users

1.Force Sharp MPEG metrics for XVID

2. Force deinterlacing when source was detected as hybrid.

3. For cartoon mode for XVID ( select this if you are ripping animated movie)

If you want to know more about hidden options click here.

7. Converting

After selecting the required hidden options now you can click on " Add Job" button. it will add job to the queue. press " start " button to start ripping.

This process will generally take about 2 hours on a medium spec PC. Time taken to complete this task depends upon your CPU. So don't worry if it takes time be patient.

Whether you like my post or don't like my post.Don't forget to leave a comment. Any suggestions for improvement are most welcome.

Hidden Options

HIDDEN OPTIONS:


There are quite a few hidden options in AutoGK these days that can be accessed via CTRL-F9 shortcut. Some of the options only work with XviD 1.0+ versions (i.e. included with AutoGK 1.25+). Most of the options are per-input settings, i.e. you can set up different settings for different movies. However there are a few that are global, so that they affect all encodings done by AutoGK. Note that you have to put you input files into separate directories if they require different hidden options as AutoGK can only set hidden options for a particular directory, not file.


Lets go through all the options one by one:

- If you're a classic film fan, then Mono MP3 Audio is very useful. The original audio for old films was mono, but often DVDs of old films will come with a dual mono AC3, and when converted to MP3, it'll retain the two channels. By converting the audio to one channel mono you can free up lots of space (sometimes 50 MB or more) to help improve the quality of the video. Even if the AC3 is single channel, if you convert it to MP3, the default will be two channels of audio, and, again, you'll want to choose the Mono MP3 option. If you do go for Mono audio (NOT recommended when the movie was originally 2 or more channels), then AutoGK takes the bitrate from Advanced Settings and divides it by 2 to produce output mono bitrate.

- XviD's Cartoon Mode, in the words of XviD developer and compiler Koepi, "enables some mechanism in the motion estimation which drops (instead of encoding them) more macro blocks. The result is a more stable, a little less detailed image. Exactly what you need for cartoons like Futurama or the Simpsons." That is to say, it can improve the quality of American style cartoons. I don't think that I'd recommend it for the more detailed Japanese anime. (ONLY XVID)

- "Force Normal IVTC" is something you'd better understand before using. Beginners can ignore it. Sometimes (rarely) AutoGK's Analysis step flubs on diagnosing the video content (and resulting AVI may be jerky or shutters a lot), and you might get better results overriding the decision that it's a hybrid, and go for a normal IVTC instead. Same goes for "Force Deinterlace" option (which can be a second choice when dealing with hybrid material)

- end "Credits" is one the most useful of the bunch. If you can cut the size of the end credits, you can use those freed-up bits to improve the quality of the movie itself. So, you check the box and fill in the time the credits start (inside the Frame Calc. box) or fill in the frame number at which they start, and set the quality percentage. This is most useful when you have fixed or scrolling white on black end credits (in which case you also check the Greyscale mode box). One way to find the frame number at which they start is to run the Preview. Then after AutoGK has created a .d2v file, open that in Gordian Knot and scroll the picture to where the end credits start, and then type that frame number into the box. A 20% figure will allow you to read the end credits, but they will be kind of messed up, with trailing milky white stuff coming from the white-on-black scrolling credits. If that doesn't bother you, then 20% is a good percentage. If you want the size reduced, but without much quality degradation, then you might select 40 or 50%. If the credits are the kind with video (like the bloopers at the end of Jackie Chan's movies), or even the kind with some pictures as the credits roll, then you may not wish to use End Credits Compression at all. But with movies with long credits, it's not uncommon to save 40 or 50 MB by using the compression feature. That will allow considerable improvement (including a higher resolution) to the movie.To calculate starting frame of the credits fill in the time that the end credits start, choose source frame rate (for PAL DVDs its 25fps, for NTSC its 29.97fps ), hit 'Calc', and the correct frame number for the credits start will be filled in. One way to get that time is to play the DVD in your computer, and skip to the chapter where the end credits start. (ONLY XVID)

- Sometimes auto crop used with default parameters by AutoGK cannot totally remove black bars or removes too much of a movie material. In this case "Tune auto crop parameters" is very handy. Threshold defines how sensitive auto crop will be: the higher the value the more cropping will be done. To completely disable audio crop you can set threshold to 0. "Number of frames to examine" is useful parameter to change if movie is a mixture of full screen/wide screen shots, so by selecting different frames that auto crop examines you can improve cropping process. "Starting frame" can help auto crop in situation when you have a full screen logo as a part of widescreen movie, in which case autocrop might decide that the whole source is full screen. By selecting a different starting frames you force auto crop not to examine irrelevant starting movie sequence. "Force cropping" option allows you to crop additional pixels after autocrop operation (if you find that you need to always crop several more pixels you can use this option). If you disable autocrop with threshold 0 then "force cropping" option becomes fully manual crop. Remember always to check how movie looks like after you set new auto crop parameters using Preview function of AutoGK.

- "Aspect ratio" is an option to override AR setting that comes out of DGIndex (indexing tool for MPEG2 files used by AutoGK). If source is misdetected as 4:3 or 16:9 then you have a choice of manually setting correct AR.

- "Reduce FPS" option is only useful for HDTV 50/60fps sources. By default AutoGK tries to restore 24fps FILM material from 60fps sources and if that is impossible then it leaves fps at 60 (50 fps sources are always left at that fps at the moment). So user can explicitly try and set lower fps. (Note: if you have a pure progressive material you may end up with shuttering video in the end when reducing fps. Use it only if you know what you're doing)

- "Force Sharp Matrix" option ensures that AutoGK will not use soft matrix no matter what. Its most useful when doing 700Mb or less encodes when ordinarily AutoGK won't use sharp matrix at all (ONLY XVID)

- KernelDeInt filter is a filter performing deinterlacing in AutoGK. Its threshold parameter allows you to control sensitivity of the filter in detection of motion areas (as static areas are ignored by the filter). This is very advanced settings and it should be used only when you get a lot of artifacts when encoding interlaced material . Please refer to the documentation of the filter for further information.

- ITU-R BT.601 Standard is an official resizing method for DVDs in hardware, however most software DVD players (like PowerDVD or WinDVD) do no use it which results in height that is ~2.5% stretched. Different sources (even DVDs) can be mastered with or without ITU standard which means that there is no universal setting that will work in all cases. Check out the forum and its discussions on the subject. Simple user guide for this option is: if you feel like your encodes come out a little bit stretched vertically then turn this option on, otherwise leave it off.

- "Display VCF scripts" option is a debug-only option and for clarity of the logs it should be switched off most of the time.

- "Adjust Subs" option is very useful option and should be turned on most of the time if you're burning subtitles into resulting AVI. It places subs at original position found on DVD instead of squashed them vertically and moving a bit up (I'm sure everyone is familiar with these problems). The only drawback is that if original subs were in the upper part of the frame (during for instance opening credits) then they will probably be lost (and that is the reason this option is not enabled by default). Another problematic sources can be 2.35 AR sources where subs appear in the black bar below main video - in this case they will be cut off by this setting as well. In all other cases subs from lower part of the video frame should be displayed properly when using this option.

- "Color correction" option allows you to slightly change color gamut closer to what the source actually contains (gamut often is changed automatically when doing MPEG2 -> MPEG4 conversion because of the tool involved, i.e. avisynth). You may notice that sometimes your XviD/DivX encodes are looking rather dark comparing to the original input source. In those cases usage of this option will help making it a little bit lighter. Not every MPEG2 input source require this correction and this option doesn't force it but rather switches ON the check if color correction is needed and applied. If color correction is needed then the encoding process can be 10-20% slower than one without it.

- "Detect 4:3 Aspect ratio and force it" option checks if AR is between 1.25 and 1.4 and if yes then crops video appropriately to get perfect 4:3 ratio (so that you won't get black bars when watching on 4:3 TV).


CREDITS FOR THE ABOVE INFOREMATION GOES TO THE CREATOR OF AUTOGK. IF LIKE THIS TOOL THEN PLEASE DONATE HIM SO THAT WE CAN SEE THIS TOOL IMPROVING. HE HAS PROVIDED US THIS LITTLE WONDERFUL TOOL FREE OF COST. IT DOES A WORK WHICH ANY PAID SOFTWARE CANT DO. I HAVE DONATED HIM. WELL IF LIKE THIS TOOL THEN DONATE HIM HERE.( http://www.autogk.me.uk).